Week One: Coptic Bound Sketchbook
Day One: Design the cover of your sketchbook. You will need:
*ONE sheet of 9x12 drawing paper cut in half
two sheets of construction paper (does not matter what color)
two pre-cut mat boards
Design the front and back cover of your sketchbook. You may draw anything you like, but your name does need to be visible somewhere on the book. You may use markers, colored pencils, watercolor, pens, sharpies, or crayons. No Chalk or acrylic.
Next, you will create your signatures. You need 5 signatures of 5 pages. Watch the next video to show you how to poke holes in your signatures.
Once your signatures are completed, you will need to poke holes into the cover. You will need a small finishing nail, a hammer, and a piece of foam for this. I will demonstrate this in class. Once you have all the holes, you will need to get a piece of waxed thread, a bookbinding needle, and watch the next video.
When you have completed the binding, move on to the inside. Design your cover page however you want, but include:
Name (first and last)
Grade level
ART II Spring 2019
www.artin418.weebly.com
Your website address
Page two and three will be your TABLE OF CONTENTS. set this up similar to your art one sketchbook.
Next, you will need to set up a website. Go to weebly.com and register with your school email. Your website address should be "www.firstnamelchs2019.weebly.com" (ex: www.catherinelchs2019.weebly.com)
***YOU WILL NOT GET CREDIT FOR THIS ASSIGNMENT IF I CAN NOT LOCATE YOUR WEBSITE! Make sure you use the correct address.
Under the "Pages" tab at the top, hit the plus sign so that you can add a page. Add "Sketchbook" and "Gallery" but make sure they are "normal" pages instead of blog pages. Your homepage should be set up like a blog.
Next, click on the "homepage" page and hit the build button. Drag A title over and add your name, and provide an introduction. Next, add a blog post on your home page for each project.
.
Blog: This is where you will blog about your piece. To start a blog post, you will insert a picture of the piece and then answer questions (I will put on here). When you write about your artwork, think about things you did well, what works, what you may have struggled with, the elements of art (formal qualities), and any other information the viewer would need to know. Imagine walking through the artwork with someone.
I will grade finished work by these pictures and blog post. Think of it like "turning it in" this way.
Week Two: Through your eyes

Week Overview:
Day One: Most of you are still working on your vellum book. Take another day/two to finish up, but then you need to wrap it up so you do not get behind. Don't forget to photograph your final project.
Day two: Work on blog posts. You should have two completed blog posts by the end of this week. One blog post will have a photo of your sketchbook, and then a brief explanation. You can tell me what you liked, what you didn't, what was hard, what was easy, what you hope to fill in your book, an explanation of your cover or cover page. This is a free-writing--I am just looking for your thoughts.
Your second blog post will be about the vellum book. Pick one photograph and then explain your process for making this book. What did you think about the vellum paper? Was it hard to work on? Easy? Did you like it?
On the gallery page, include photographs of all completed work. On this site, you may include more than one photograph of your work.
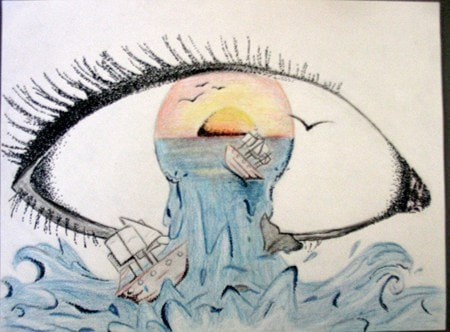
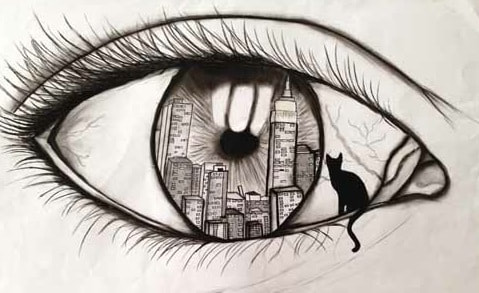
Day three: Start on your EYE drawing. This will be a very large drawing of an eye, but I want it to include more than that. What have you seen? What do you see in the future? These are things I want you to ponder while creating this. In your pupil/iris how can you add these elements to make it more interesting?
On page 6 of your sketchbook, practice a few eyes. Use the handout if needed or use the ipad for inspiration. Start sketching out ideas for what you see.
On page 7 draw your final draft.
Day One: Most of you are still working on your vellum book. Take another day/two to finish up, but then you need to wrap it up so you do not get behind. Don't forget to photograph your final project.
Day two: Work on blog posts. You should have two completed blog posts by the end of this week. One blog post will have a photo of your sketchbook, and then a brief explanation. You can tell me what you liked, what you didn't, what was hard, what was easy, what you hope to fill in your book, an explanation of your cover or cover page. This is a free-writing--I am just looking for your thoughts.
Your second blog post will be about the vellum book. Pick one photograph and then explain your process for making this book. What did you think about the vellum paper? Was it hard to work on? Easy? Did you like it?
On the gallery page, include photographs of all completed work. On this site, you may include more than one photograph of your work.
Day three: Start on your EYE drawing. This will be a very large drawing of an eye, but I want it to include more than that. What have you seen? What do you see in the future? These are things I want you to ponder while creating this. In your pupil/iris how can you add these elements to make it more interesting?
On page 6 of your sketchbook, practice a few eyes. Use the handout if needed or use the ipad for inspiration. Start sketching out ideas for what you see.
On page 7 draw your final draft.
Week THree: MetaMorphosis
Week Four: Playing Card
Sketchbook
1. Cover Page
2. TOC
3. Eye Practice
4. Eye Draft
5. Animal/Dragon Eye
6. Prompt
7. Metamorphosis Draft
8. Favorite Cartoon Character
9. Favorite Animal (not a cartoon)
10. Playing Card Draft (4 ideas.. thorough plan)
11. Font Practice (at least 3 different kinds)
12. Prompt
2. TOC
3. Eye Practice
4. Eye Draft
5. Animal/Dragon Eye
6. Prompt
7. Metamorphosis Draft
8. Favorite Cartoon Character
9. Favorite Animal (not a cartoon)
10. Playing Card Draft (4 ideas.. thorough plan)
11. Font Practice (at least 3 different kinds)
12. Prompt
Website
For the month of August, there should be 4 project updates in the blog and 12 sketchbook pictures uploaded. For each blog post, upload a picture of your project (including multiple angles if needed) and write a summary of the project. For this summary, you should consider these questions:
1.) What did you do?
2.) How is your project unique?
3.) What worked really well? What were you really good at?
4.) What was difficult?
5.) What did you learn?
1.) What did you do?
2.) How is your project unique?
3.) What worked really well? What were you really good at?
4.) What was difficult?
5.) What did you learn?
DUE DATES AND GRADES
For the month of August you will receive 14 grades.
Sketchbook Creation 25 points
Eye Drawing 25 points
Metamorphosis 25 points
Playing Card 25 points
Website Creation 10 points
Website update (x4) 10 points each
Sketchbook Grade: 120 points ( 12 pages @ 10 points each)
Four Participation grades @ 10 points each week.
Sketchbook Creation 25 points
Eye Drawing 25 points
Metamorphosis 25 points
Playing Card 25 points
Website Creation 10 points
Website update (x4) 10 points each
Sketchbook Grade: 120 points ( 12 pages @ 10 points each)
Four Participation grades @ 10 points each week.
